Display Seamless View
Among the operations in the POST paymentOrders response, you will find the
view-checkout. This is the one you need to display the purchase module.
Response
1
2
3
4
5
6
7
8
9
10
11

{
    "paymentOrder": {
    "operations": [
        {
            "method": "GET",
            "href": "https://ecom.externalintegration.payex.com/payment/core/js/px.payment.client.js?token=dd728a47e3ec7be442c98eafcfd9b0207377ce04c793407eb36d07faa69a32df&culture=sv-SE&_tc_tid=30f2168171e142d38bcd4af2c3721959",
            "rel": "view-checkout",
            "contentType": "application/javascript"
        },
    ]
}
Load The Seamless View
Embed the href in a <script> element. That script will then load the
Seamless View.
To load the Checkout from the JavaScript URL obtained in the backend API
response, it needs to be set as a script element’s src attribute. You can
cause a page reload and do this with static HTML, or you can avoid the page
refresh by invoking the POST to create the payment order through Ajax, and then
create the script element with JavaScript. The HTML code will be unchanged in
this example.
JavaScript
1
2
3
4
5
6
7
8
9
10
11
12
13
14
15
16
17
18
19
20
21
22
23
24
25
26
27

var request = new XMLHttpRequest();
request.addEventListener('load', function () {
    response = JSON.parse(this.responseText);
    var script = document.createElement('script');
    var operation = response.operations.find(function (o) {
        return o.rel === 'view-checkout';
    });
    script.setAttribute('src', operation.href);
    script.onload = function () {
        // When the 'view-checkout' script is loaded, we can initialize the
        // Payment Menu inside 'checkout-container'.
        payex.hostedView.checkout({
            container: {
                checkout: "checkout-container"
            },
            culture: 'nb-No',
        }).open();
    };
    // Append the Checkout script to the <head>
    var head = document.getElementsByTagName('head')[0];
    head.appendChild(script);
});
// Like before, you should replace the address here with
// your own endpoint.
request.open('GET', '<Your-Backend-Endpoint-Here>', true);
request.setRequestHeader('Content-Type', 'application/json; charset=utf-8');
request.send();
HTML
1
2
3
4
5
6
7
8
9
10
11

<!DOCTYPE html>
  <html>
      <head>
          <title>Swedbank Pay Checkout is Awesome!</title>
      </head>
      <body>
          <div id="checkout-container"></div>
          <!-- Here you can specify your own javascript file -->
          <script src="<Your-JavaScript-File-Here>"></script>
      </body>
  </html>
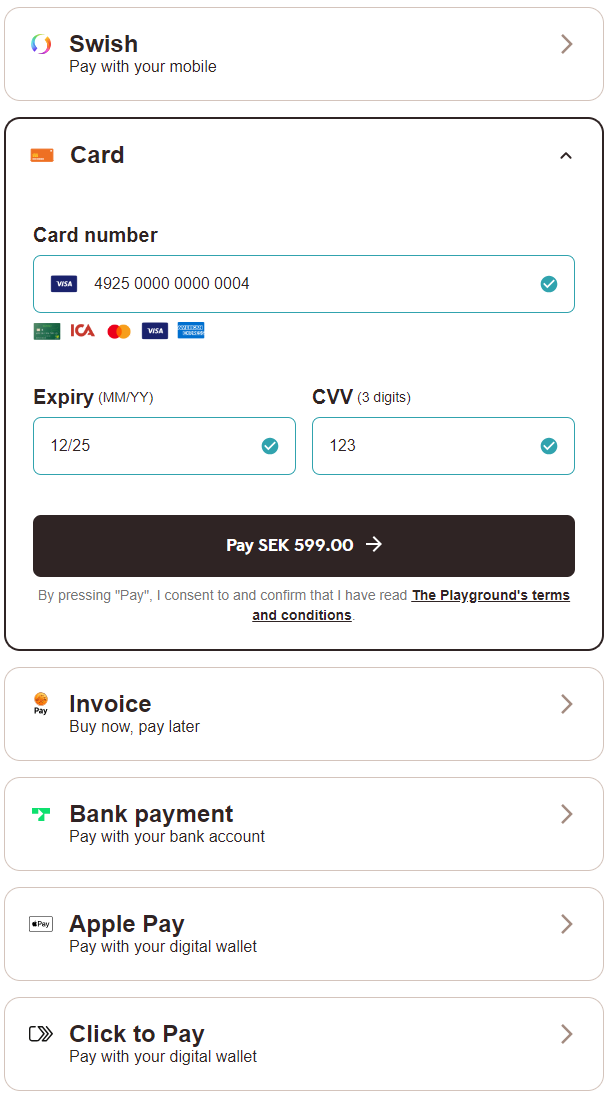
How Seamless View Looks
The payment UI should appear in the iframe on your page, so the payer can select their preferred payment method and pay.

Once the payer has completed the purchase, you can perform a GET towards the
paymentOrders resource to see the purchase state.
Monitoring The Script URL
You must confirm that your site is not susceptible to attacks from scripts that could affect the merchant’s e-commerce system(s).
Events
When integrating Seamless View we strongly recommend that you implement the
onPaid event, which will give you the best setup. Even with this implemented,
you need to check the payment status towards our APIs, as the payer can make
changes in the browser at any time.
You can read more about the different Seamless View Events available in the feature section.
You are now ready to capture the funds. Follow the link below to read more about capture and the other options you have after the purchase.
Seamless View Sequence Diagram
Note that in this diagram, the Payer refers to the merchant front-end (website) while Merchant refers to the merchant back-end.
sequenceDiagram
    participant Payer
    participant Merchant
    participant SwedbankPay as Swedbank Pay
    participant 3rdParty

        rect rgba(238, 112, 35, 0.05)
            activate Payer
            Payer ->>+ Merchant: Initiate Purchase
            deactivate Payer
            Merchant ->>+ SwedbankPay: POST /psp/paymentorders (hostUrls, paymentUrl, payer information)
            deactivate Merchant
            SwedbankPay -->>+ Merchant: rel:view-checkout
            deactivate SwedbankPay
                        Merchant -->>- Payer: Display SwedbankPay Payment Menu on Merchant Page
    activate Payer
    Payer ->> Payer: Initiate Purchase step
    deactivate Payer
    activate SwedbankPay
        SwedbankPay ->>+ Payer: Do purchase logic
    Payer ->> SwedbankPay: Do purchase logic
    deactivate Payer
    deactivate SwedbankPay

                opt Payer performs purchase out of iFrame
                    activate Payer
                    Payer ->> Payer: Redirect to 3rd party
                    Payer ->>+ 3rdParty: Redirect to 3rdPartyUrl URL
                    deactivate Payer
                    3rdParty -->>+ Payer: Redirect back to paymentUrl (merchant)
                    deactivate 3rdParty
                    Payer ->> Payer: Initiate Payment Menu Seamless View (open iframe)
                    Payer ->>+ SwedbankPay: Show Payment UI page in iframe
                    deactivate Payer
                end

                activate SwedbankPay
                SwedbankPay -->> Payer: Purchase status
                deactivate SwedbankPay

            alt If purchase is completed
            activate Payer
            Payer ->> Payer: Event: onPaid ①
            Payer ->>+ Merchant: Check purchase status
            deactivate Payer
            Merchant ->>+ SwedbankPay: GET <paymentorder.id>
            deactivate Merchant
            SwedbankPay ->>+ Merchant: Status: Paid
            deactivate SwedbankPay
            end

            activate Merchant
Merchant -->>- Payer: Show Purchase complete
            end

                alt If purchase is failed
                Merchant ->>+ SwedbankPay: GET {paymentorder.id}
                deactivate Merchant
                SwedbankPay -->>+ Merchant: Status: Failed
                deactivate SwedbankPay
                activate Merchant
                Merchant -->>- Payer: Display SwedbankPay Payment Menu on merchant page
                end

                opt PaymentOrder Callback (if callbackUrls is set) ②
                activate SwedbankPay
                SwedbankPay ->> Merchant: POST Purchase Callback
                deactivate SwedbankPay
         end


    rect rgba(81,43,43,0.1)
        activate Merchant
        note left of Payer: Capture
        Merchant ->>+ SwedbankPay: rel:capture
        deactivate Merchant
        SwedbankPay -->>- Merchant: Capture status
        note right of Merchant: Capture here only if the purchased<br/>goods don't require shipping.<br/>If shipping is required, perform capture<br/>after the goods have shipped.<br>Should only be used for <br>payment methods that support <br>Authorizations.
        end
- ① See seamless view events for further information.
- ② Read more about callback handling in the technical reference.